Houghton Photo · User guide
The Exposure Triangle
A camera you can learn on. Turn the dials, watch the photograph change, and read why it changed in plain English.
What the app is
The Exposure Triangle teaches the three settings behind every photograph: the aperture, the shutter speed and ISO. You change them on a camera that behaves like a real one, and the picture answers straight away.
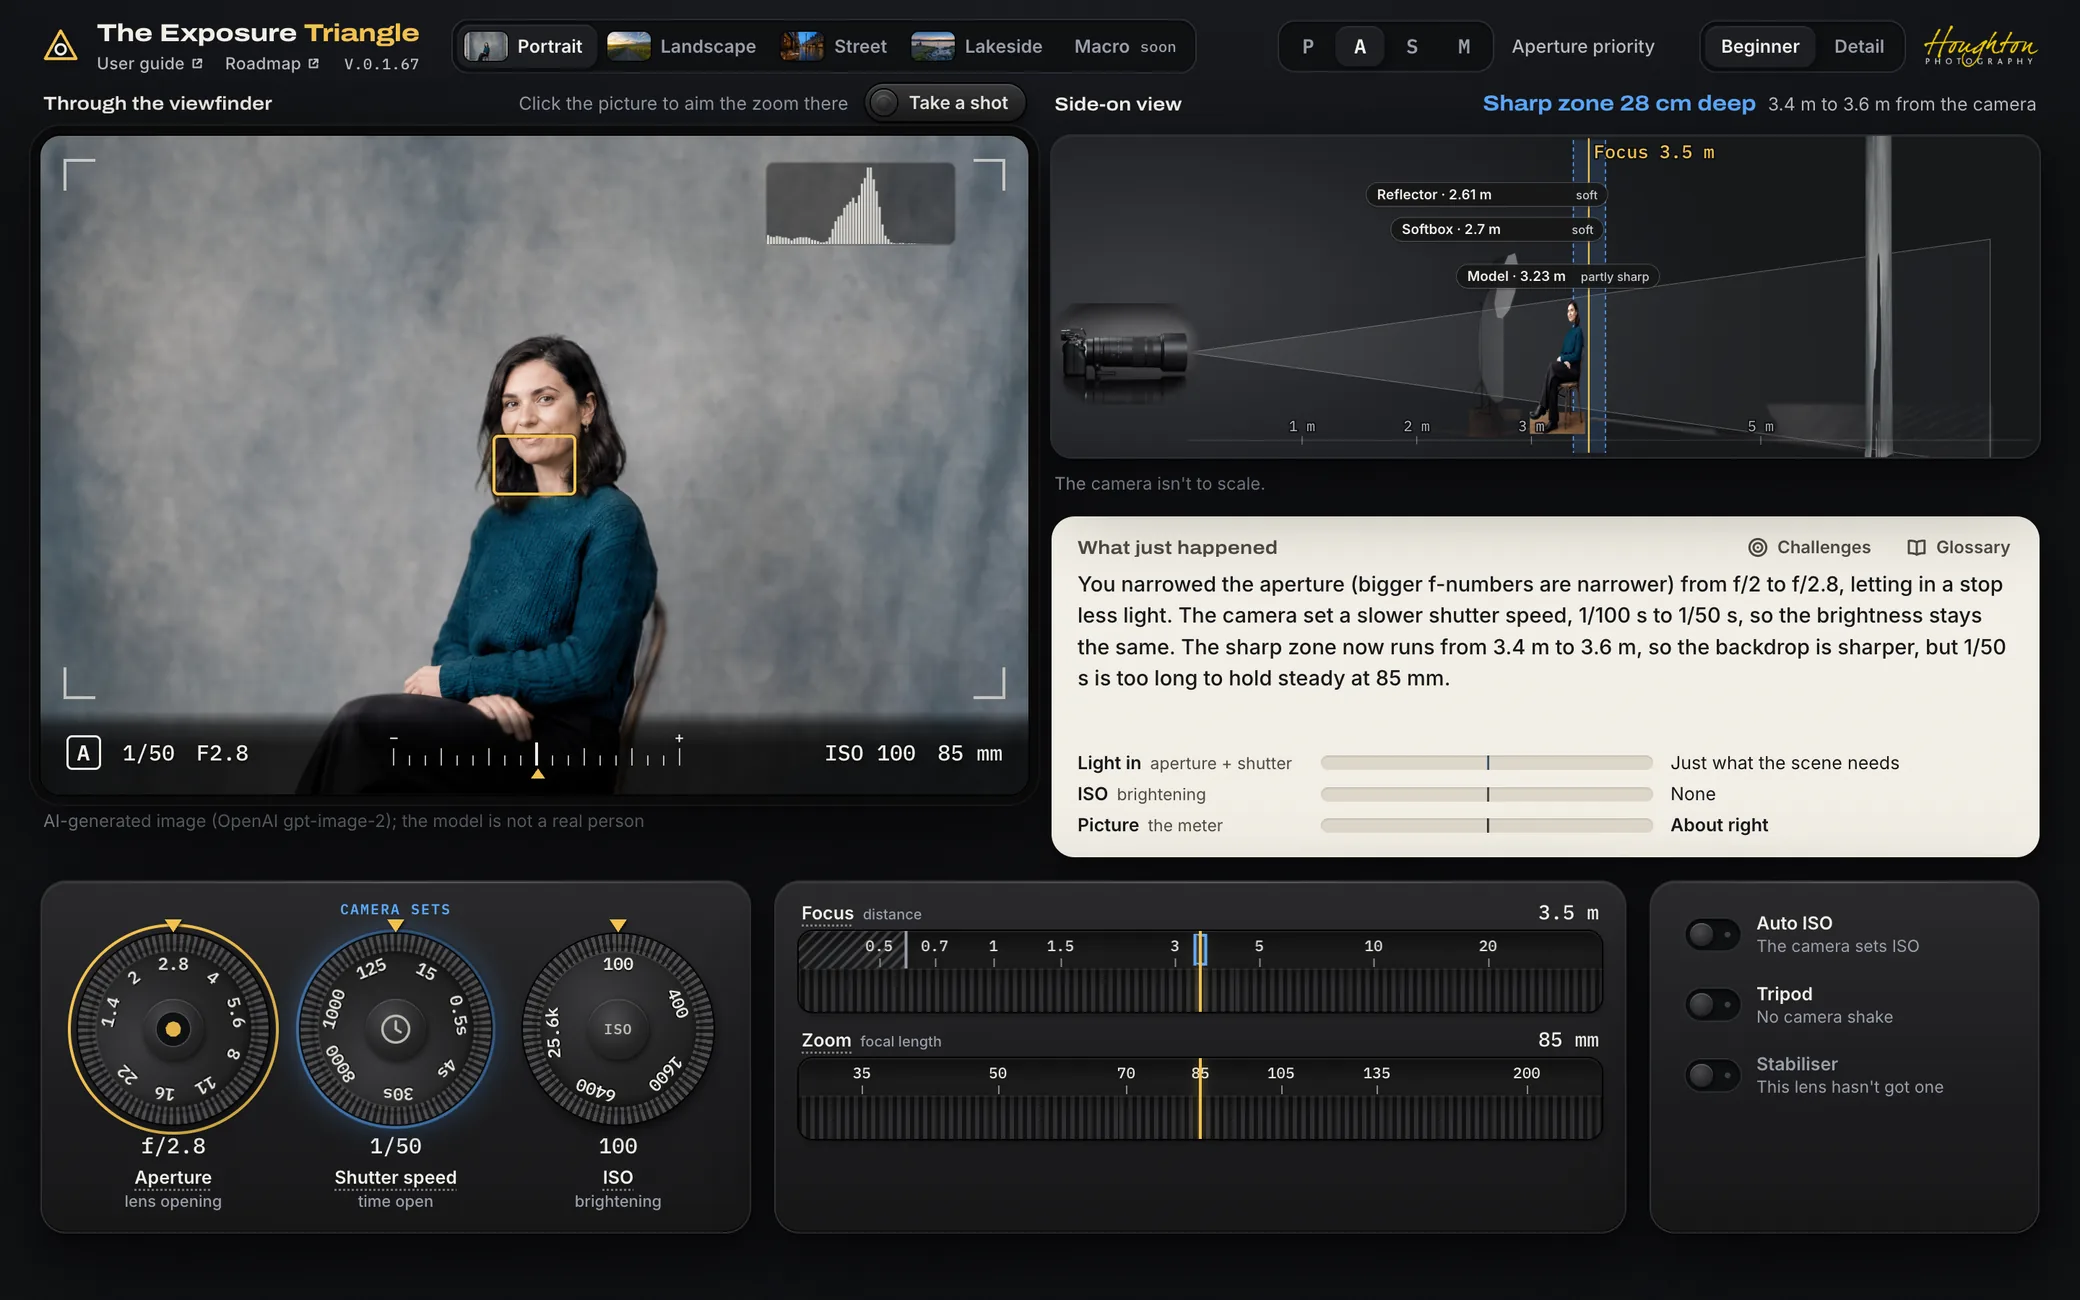
Two views show the result side by side. The viewfinder shows the photograph as the camera would take it, with its brightness, its blur and its grain. The side-on view shows the same scene from the side and draws the sharp stretch across it, so you can see why the backdrop went soft.
After every change, a short note says what just happened and why. It isn't a course you read from front to back: try something, watch what it does, and read the note.
Before you begin
- A laptop or desktop computer. The camera needs a window 1280 pixels wide or more to show everything at once. At 1280 by 800, 1366 by 657 and 1440 by 900, the viewfinder, the side-on view and the controls all fit on one screen, and the page doesn't scroll. On the shortest of those, a running challenge's panel scrolls inside itself, and its hint and next-step buttons stay in sight. Between 961 and 1279 pixels it still works, and the bar tucks a few labels away; at 960 and below, the views stack in one column and the page scrolls. A phone layout comes later.
- A recent browser with WebGL2. WebGL2 is the graphics system that draws the picture, and every recent browser has it, as long as hardware acceleration is on. Every check so far ran in Chromium, the engine inside Chrome and Edge. Safari and Firefox checks come later.
- A good connection for the first visit. The camera opens on the portrait. A still of its opening view appears with the page, the live camera takes over as soon as its first photograph arrives, and the rest of its 56 MB loads behind the picture. The road landscape and the rainy street are bigger, at about 112 MB and 103 MB, and the lakeside is about 60 MB (see Troubleshooting). Once the scene you opened has every photograph, the app downloads the other scenes in the background, so switching to one doesn't mean waiting for its download. That's about 330 MB in all on a first visit; if your browser is set to save data, it skips this.
- Nothing else. There's no account, no sign-in and nothing to install.
The viewfinder and the side-on view
The viewfinder
The left-hand picture is what the camera sees. The strip along its bottom edge reads like a camera's electronic viewfinder: the mode, the shutter speed, the f-number, the exposure meter, ISO and the focal length.
- The meter runs from three stops too dark (−) to three stops too bright (+). The pointer sits on the centre line when the exposure's right.
- The histogram, top right, shows how the picture's tones spread, from black on the left to white on the right.
- The focus box turns dashed when the subject falls outside the sharp zone.
- When you zoom out, a frame marks the framing you started from (“Your 85 mm framing”), so you can see how much wider the new view is.
Take a shot, and camera shake
Take a shot, at the right-hand end of the viewfinder's title, records the picture the way the camera would. If the shutter stays open too long to hold the camera steady by hand, the shot shows the shake as blur, and the live view wanders a little to warn you. The shot stays on screen with a Your shot label until you change a setting. With the viewfinder selected, Space or Enter does the same.
The side-on view
The strip on the right shows the scene from the side: the camera on the left, then what's in front of it, nearest first. On the portrait that's a reflector, a softbox, the model and the backdrop; on the road landscape, the gate, the car, the sheep and a cottage; on the rainy street, the café table, the lamp post, the cyclist, the walkers, the bus and the church; at the lakeside, the cascade, the figure on his bench, the heron and the far shore. The blue band is the sharp zone, the stretch of distance that comes out sharp, and the headline above it gives its depth, such as “Sharp zone 28 cm deep”. The drawing doesn't show the camera to scale, and the distance scale tightens beyond 12 m on the road landscape, beyond 10 m on the rainy street and beyond 6 m at the lakeside, so things far off still fit.
Dials, rings and switches
Everything you change sits in the row underneath the two views: three dials on the left, two lens rings in the middle and the switches on the right.

| Control | What it does |
|---|---|
| Aperture lens opening | How wide the lens opens. The numbers run back to front: a smaller f-number is a wider aperture, which lets in more light and makes the sharp zone shallower. |
| Shutter speed time open | How long the shutter stays open. A slower shutter speed lets in more light, and blurs anything that moves, your hands included. |
| ISO brightening | How much the camera brightens what it records. Higher is brighter, with more grain. |
| Focus ring distance | The distance that's sharpest. The hatched end is closer than this lens can focus at this focal length. |
| Zoom ring focal length | How much of the scene fills the frame, from wide to close. |
Turning them
Drag round a dial (or sideways), use the scroll wheel, or tap a number on its scale to jump straight there. The rings work the same way. When the camera is setting a dial for you, CAMERA SETS shows above it. When a setting runs out of room, its value blinks amber three times and keeps an amber outline until you change something.
The mode: P, A, S and M
| Mode | Who sets what |
|---|---|
| P Program | The camera picks both the aperture and the shutter speed. Turn either dial and it switches to A or S, so you can choose that one yourself. |
| A Aperture priority | You set the aperture; the camera sets the shutter speed. |
| S Shutter priority | You set the shutter speed; the camera sets the aperture. |
| M Manual | You set everything, and the meter shows the result. |
Turning a dial the camera is setting hands it back to you: the aperture puts the camera in A, the shutter speed puts it in S, and ISO turns Auto ISO off. Switching mode keeps the exposure you had.
The switches
| Switch | What it does |
|---|---|
| Auto ISO | The camera chooses ISO for you, to keep the exposure right. |
| Tripod | Holds the camera still, so a long shutter speed no longer blurs the whole picture. A moving subject, such as the road landscape's car, still blurs: the tripod holds the camera, not the subject. |
| Stabiliser | Steadies a hand-held lens by a few stops. None of the three scenes' lenses has one, so for now the switch stays greyed out. |
| Idealised lens Detail only | Lifts the real-world limit on how wide a long lens can open (a front element no bigger than 150 mm). The closest focus distance stays as it is. On the 14 to 600 mm zoom of the road landscape and the rainy street, the limit starts to bite past about 210 mm: at 600 mm the widest aperture is f/4, and the switch opens it to f/1.4. The portrait's and the lakeside's zooms stop at 200 mm, so there it changes nothing. |
The keyboard
| Keys | What they do |
|---|---|
| Tab | Moves between the controls. The first press offers a link that skips straight to the camera controls. |
| ↑ ↓ ← → | On a dial, a third of a stop; on a ring, a small step. On the scene, mode and level buttons, they choose the next one. |
| Page Up Page Down | On a dial, a whole stop; on a ring, a bigger step. |
| Home End | The two ends of a dial or a ring. |
| Space Enter | With the viewfinder selected, take a shot. |
| Esc | With the viewfinder selected, go back to the scene's own framing. In the glossary, clear the search, then close it. |
Click to aim
Click anywhere on the picture and the zoom aims there, so zooming in closes in on that spot rather than the middle of the frame. A small cross marks it. Double-click the picture, or press Esc with it selected, to go back to the scene's own framing. With the viewfinder selected, the arrow keys move the aim.
What just happened, and the light ledger
The cream panel under the side-on view explains each change once you let go of the control: what you changed, what the camera did in reply, and what that means for the picture. It never runs to more than three sentences.
Underneath, the light ledger adds up the exposure in three rows:
| Row | What it shows |
|---|---|
| Light in | How much light the aperture and the shutter speed let in, against what the scene needs at ISO 100. |
| ISO | How much ISO brightens that light. |
| Picture | The two added together, which is what the meter shows, with a verdict in words such as “About right” or “A stop too dark”. |
Detail adds the exposure value, and how much light a mid-grey pixel collects, counted in electrons, with its signal-to-noise ratio.
Beginner and Detail
The Beginner and Detail switch at the top right sets how the app talks to you. Change it whenever you like: the last note rewrites itself at the new level.
- Beginner uses plain words. The dials keep the names photographers use, aperture, shutter speed and ISO, with a plain meaning under each. The first time the aperture or ISO comes up, the note adds a reminder in brackets: bigger f-numbers are narrower, and ISO is brightening.
- Detail uses photographers' terms and adds the numbers behind them: exposure value, the circle of confusion, the hyperfocal distance, the angle of view, the closest focus distance and how much light a mid-grey pixel collects. It also adds the Idealised lens switch, and the challenges' hints come without a wait.
Challenges and the glossary
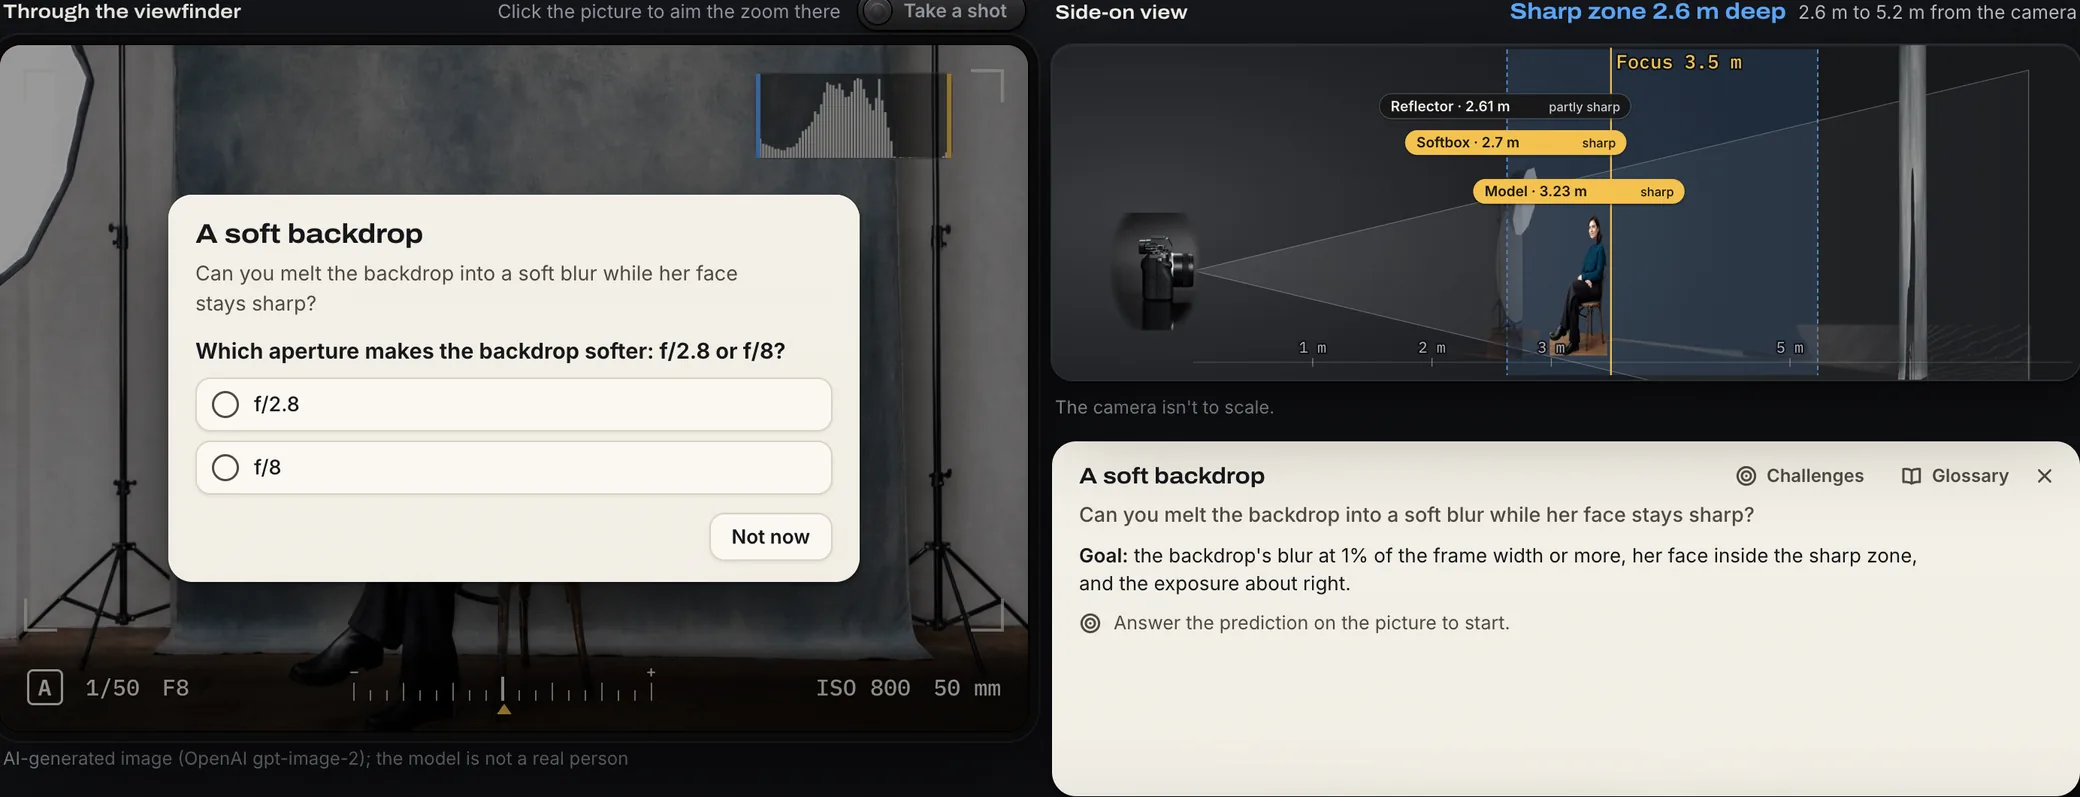
There are seven short challenges. The app checks the picture itself, so any settings that get there count. Six are ready now: three on the portrait (A soft backdrop, Low light without the grain and Nail the exposure in Manual), Sharp from front to back on the road landscape, Freeze the cyclist on the rainy street and Silky water at the lakeside. Start one from another scene and the camera switches scenes for you.
The seventh, Squash the background, waits for a way to step the camera back.
- Open Challenges on the cream panel's header, and pick one.
- Predict first. The question appears on the picture, and the controls wait until you answer.
- Try it. The panel shows each goal live, with a tick once the picture meets it.
- Stuck? In Beginner the panel offers a hint after two tries that miss, or after a minute, and each further hint comes at least five seconds later. The third, Show me, sets the answer on the camera for you.
- Once it's done, the panel asks why it worked. Think about it, show the answer, then go on to the next challenge.
One goal to know about: in Nail the exposure in Manual, ISO has to stay where it started. Turn it up, by hand or with Auto ISO, and that goal stays unticked.
The glossary
Glossary, on the same header, holds 29 words, from exposure and stop to the idealised lens. The search matches the start of any word, so “grain” finds noise. Click a dial's or a ring's name to jump straight to its entry.
The scenes
Four scenes are live. Pick one from the scene buttons at the top.
- The studio portrait is where the camera opens: a model in front of a studio backdrop, with a 24 to 200 mm zoom that opens to f/1.4.
- The road landscape is a country road running towards mountains 8 km off, with a field gate 5.5 m away, sheep grazing beyond it and a white cottage, on a 14 to 600 mm zoom. It's the first scene with something moving: a car driving away from you down the road. Put the camera on the tripod and try a slow shutter speed on it. Because it's heading away rather than crossing the frame, it blurs far less than a car driving across the picture would.
- The rainy street is a wet city street at blue hour, looking up the road to a church spire 220 m away, on the same 14 to 600 mm zoom. A café table sits beside you, with a lamp post 3.5 m off. A cyclist rides away up the road at an angle, so part of his speed crosses the frame: at 24 mm, 1/30 s smears him and 1/500 s freezes him.
- The lakeside looks across a lake at dusk to a far shore 800 m away, with a bronze figure on a bench 5.9 m off and a small cascade tumbling over rocks at your feet, on a 16 to 200 mm zoom. Two things move: the water and a heron flying across, whose reflection streaks with it. At 20 mm on the tripod, 1/2 s turns the cascade into a silky veil and 1/500 s freezes its droplets. The lake smooths more slowly, because its ripples move far more slowly than the falling water.
One more scene is on its way: a bee on a coneflower. Until it arrives, the scene picker marks it soon and you can't choose it.
Every scene starts from AI-generated photographs, and none of them shows a real person. The Roadmap page shows how each scene is coming along.
Privacy
The app doesn't ask who you are, and it keeps nothing about you.
- There are no accounts and no sign-in.
- It sets no cookies, and it stores nothing in your browser.
- It counts visits with Vercel Web Analytics, which sets no cookie and shows only totals. To tell one visit from another, it uses a code made from your browser's request and throws that code away after 24 hours.
- There are no adverts and no other tracking.
- Its pages and fonts come from its own site. The photographs come from Cloudflare's storage, which, like any web host, sees your IP address when your browser asks for them.
- Your settings live only in the open tab. Close it and they're gone.
The Houghton Photo logo links to houghtonphoto.com, which has its own privacy terms. The app's pages come from Vercel and its photographs from Cloudflare, and each has its own privacy terms: Vercel's and Cloudflare's. Vercel explains how its visit counts work in its analytics privacy notes.
Troubleshooting
| Problem | What to do |
|---|---|
| The picture says “WebGL2 is not available in this browser” | Your browser can't draw the picture. Switch hardware acceleration on in its settings (in Chrome, it's under System), restart the browser and reload. If that doesn't help, try Chrome or Edge on another computer. |
| Loading takes a long time | Each scene opens on a still of its first view, and the live camera takes over as soon as its first photograph arrives. The rest, with their depth and cut-outs, load behind the picture: about 56 MB for the portrait's 4, about 112 MB for the road landscape's 6, about 103 MB for the rainy street's 6, and about 60 MB for the lakeside's 4. Until they're all in, zooming shows a softer picture, and a note at the bottom left of the picture counts them in. After that, the other scenes download in the background; a scene you switch to before its download has finished loads the rest itself. |
| The page scrolls, or the controls are cut off | Make the window 1280 pixels wide or more, or zoom the page out (Ctrl and minus, or Cmd and minus on a Mac). |
| A dial won't turn any further | It's at the end of its range. If a challenge has just started, the controls wait until you answer its prediction on the picture. |
| A scene says soon | It isn't ready yet. The Roadmap page shows how it's coming along. |
| Something else looks wrong | There's no feedback form yet. The Roadmap page lists it as planned. When you tell me about it, quote the version under the app's name at the top left, such as V.0.1.65. |
Version history
| Version | Date | What changed |
|---|---|---|
| 1.8.4 | 26 September 2026 |
|
| 1.8.3 | 26 September 2026 |
|
| 1.8.2 | 26 September 2026 |
|
| 1.8.1 | 26 September 2026 |
|
| 1.8.0 | 25 September 2026 |
|
| 1.7.0 | 25 September 2026 |
|
| 1.6.2 | 25 September 2026 |
|
| 1.6.1 | 25 September 2026 |
|
| 1.6.0 | 25 September 2026 |
|
| 1.5.0 | 25 September 2026 |
|
| 1.4.0 | 25 September 2026 |
|
| 1.3.0 | 25 September 2026 |
|
| 1.2.0 | 25 September 2026 |
|
| 1.1.0 | 25 September 2026 |
|
| 1.0.0 | 25 September 2026 |
|